How to Automate API Testing: A Tutorial
Automated testing principles support developers in quickly bringing reliable, resilient apps to production with minimal maintenance afterward


As software developers, we have an extensive toolbox from which to pull resources that help us deliver our best work. One of the most important of these tools is the application programming interface (API). An API is an interface that connects two or more applications over the internet.
API testing allows us to write automated tests, avoiding the tedious task of manually testing our API endpoints one at a time. After examining some benefits of testing throughout the development process, we’ll use an automated testing platform to run some tests on a very basic API.
Throughout the process, you’ll find out how simple it is to integrate testing throughout your workflow to ensure that your APIs are always running well. You’ll also see that the testing process can be configured to reduce downtime to negligible amounts.
The benefits of automated API testing
Simply put, writing tests helps check if our APIs are working as expected by providing the following benefits:
- Automating testing can be set up ahead of time to catch edge cases. This prevents bugs in scenarios we haven’t considered from slipping into production.
- Enables more frequent testing, which helps us catch bugs early in the development cycle before they snowball into larger problems downstream.
- Our applications become more performant.
- We can develop APIs much quicker by applying existing test suites.
- Automated testing is less costly than manual efforts as a function of both the reduced quantity of work and the reduced staff hours required for work that’s easier.
- Automated testing suites make our software more secure by removing a potential point of oversight and ensuring that certain characteristics are always reliably tested.
- Test suites scale well with applications.
- Test suites can be modularized, expanded upon, and applied outside of the scenarios they were initially designed for.
While we can write API tests in any programming language, XML and JSON are commonly used because their structured nature enables quick and simple verification.
These advantages outweigh any initially increased overhead from establishing and maintaining a test suite. So, let’s look at three popular automated testing tools.
Postman
Postman is an API platform that services the entire API lifecycle, offering a repository, tools, and integrations intended to streamline development and collaboration. The client allows us to build HTTP requests that we can send to the server running the API. Postman is also available as a standalone app available for Windows, macOS, and Linux.
If you are new to Postman, we recommend viewing the getting started documentation page, as it will help you follow along with the example testing process in this tutorial.
Visit the download guide page to select the appropriate client for your development environment.
Swagger
Swagger is a set of open-source and professional tools for API design and documentation. The platform focuses on standardization to build stable and reusable APIs, emphasizing strict adherence to best practices and other guidelines for developers and product managers.
To learn more, check out the Swagger API tools page.
Katalon
Katalon is an end-to-end automation platform that supports web, mobile, and API automated testing, and offers a low-code solution for beginners. Katalon focuses on continuous testing and a wide range of integrations, including tools like Jira, Jenkins, and Git. Furthermore, Katalon supports Windows, macOS, and Linux operating systems.
To download Katalon Studio, check out the installation guide.
Build an API endpoint using JavaScript
We’ll start our API testing by building a simple endpoint using Javascript. We’ll create an HTTP GET request using Express.js, which is a Node.js framework for building APIs and back ends. Make sure you have Node.js and npm installed on your machine to follow along in this tutorial.
Set up your environment
To begin, navigate to the directory where you would like to create this project. Then, create a new directory with the following command:
mkdir api-testing && cd api-testingNext, initialize the project:
npm init -yThe -y flag fills the package.json file with the default values. You can always update these settings later.
Next, we need an entry point for the application.
In the api-testing/ folder, create a file called index.js.
With our initial setup done, let’s install our server dependencies.
Create a server
First, we need to install Express.js and nodemon dependencies. Express is a back-end Node.js web application framework. Nodemon is a node replacement wrapper, originally written to restart hanging processes. We’ll use Express to create our server, and nodemon to automatically restart our server upon file changes.
Enter the following command in your Command-line interface (CLI):
npm install express nodemonThen, enter the following code in api-testing/index.js:
const express = require('express');
const app = express();
const PORT = 3000;
This calls the Express module and generates our server with the app variable, which handles the request and response from the server to the client. It also declares a PORT variable and sets its value to 3000.
Next, add the following code to api-testing/index.js:
const data = [
 {
 id: 1,
 name: 'Teri',
 age: 30,
 occupation: 'Software Developer',
 },
 {
 id: 2,
 name: 'Fred',
 age: 32,
 occupation: 'Nurse',
 },
 {
 id: 3,
 name: 'Tosin',
 age: 22,
 occupation: 'Tax Analyst',
 },
 {
 id: 4,
 name: 'Tega',
 age: 27,
 occupation: 'Cybersecurity',
 },
 {
 id: 5,
 name: 'Obinna',
 age: 35,
 occupation: 'Cinematographer',
 },
];
This creates an array of objects in the GET request method.
Next, add the following code to api-testing/index.js:
app.get('/', (req, res) => {
 res.status(200).send({
 msg: 'Welcome to the test API page',
 });
});
This code tells Express how to handle the GET request for our server. The app.get function takes two parameters that tell the server what to do with the GET request. The first parameter is the root route, which is at localhost:3000. The second parameter takes a callback function with the req and res objects.
The req object sends the request to the server, and the res object responds with a JSON-formatted message saying “Welcome to the test API page.”
Next, we need to tell the /people route to send the data object array back with the GET request method.
Add the following code to api-testing/index.js:
app.get('/people', (req, res) => {
 res.status(200).send(data);
});

app.listen(`${PORT}`, () => {
 console.log(`listening to port:${PORT}`);
});
The /people route gets a response status code of 200, which means that the request succeeded with an OK status. It then sends a response containing the data array to localhost:3000/people.
Finally, app.listen is a function that runs an instance of our app with the port variable set to 3000. The second parameter, a callback function, returns a response in the console of our terminal.
Before we run the application, we need to update our package.json file with a few scripts.
Add the following code to /package.json:
{
 // other configuration settings

 "scripts": {
 "start": "nodemon index.js",
 },

 // other configuration settings
}
Next, start the server by entering the following command in your CLI:
npm run startThen, visit localhost:3000 and localhost:3000/people in your browser to confirm that the app produces the appropriate messages. Navigating to the root URL at localhost:3000 should return a message saying “Welcome to the test API page.”
The URL at localhost:3000/people should return the JSON object from the /people route in the console:
[{"id":1,"name":"Teri","age":30,"occupation":"Software Developer"},
{"id":2,"name":"Fred","age":32,"occupation":"Nurse"},
{"id":3,"name":"Tosin","age":22,"occupation":"Tax Analyst"},
{"id":4,"name":"Tega","age":27,"occupation":"Cybersecurity"},
{"id":5,"name":"Obinna","age":35,"occupation":"Cinematographer"}]
We have successfully created our server, and we’re ready to start testing automation.
Test APIs using Postman
Test automation is crucial for accurate real-time reports. It reduces human error and gives precise information for resolving issues as they arise.
Here, we will create a collection of tests to validate that APIs remain functional in production when code changes. We will use the JavaScript assertion library Chai.js for the test suites below.
Build the first test
To execute our first test in the Postman app, we need to send a request. We’ll begin by testing our home endpoint.
Select the + button near the top of the window to open a new tab and create a new request.
Next, enter “localhost:3000” in the text entry box beside the GET dropdown list button.
To write your assertion test, select the Tests tab and enter the following JavaScript code:
pm.test("Status code is 200", () => {
 pm.response.to.have.status(200)
})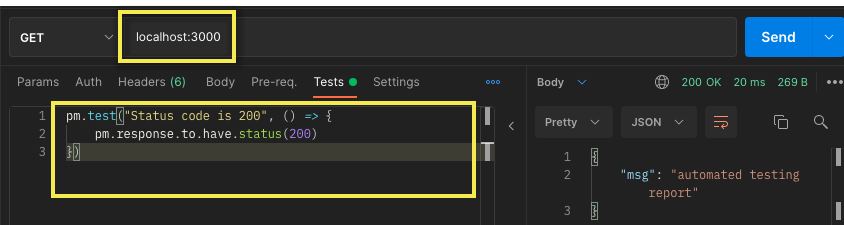
The test assertions should return a passed test on the GET request to localhost:3000, with the expected welcome response sent to the test API page.
Next, let’s test for the response from the server we defined in the index.js file by adding a few more test assertions.
Add the following code in the Tests tab:
const response = pm.response.json()
console.log(response) // add this

pm.test("Status code is 200", () => {
 pm.expect(response.msg).to.eql("welcome to the test api page")
})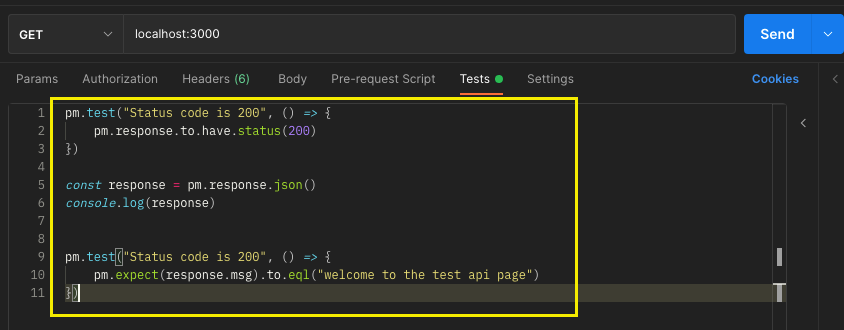
To parse data as a JavaScript object, we define a constant and initialize using a response calling a json function. We then retrieve the value in the response using the console.log function.
To finish processing the response data, our final test assertion checks if the message from the GET requests equals “Welcome to the test API page.”
Let’s try another test assertion with the /people endpoint.
Clear the contents of the Tests tab and then enter the following code:
pm.test("response is an array of objects", () => {
 pm.response.to.have.status(200)
})

const response = pm.response.json()
console.log(response[0])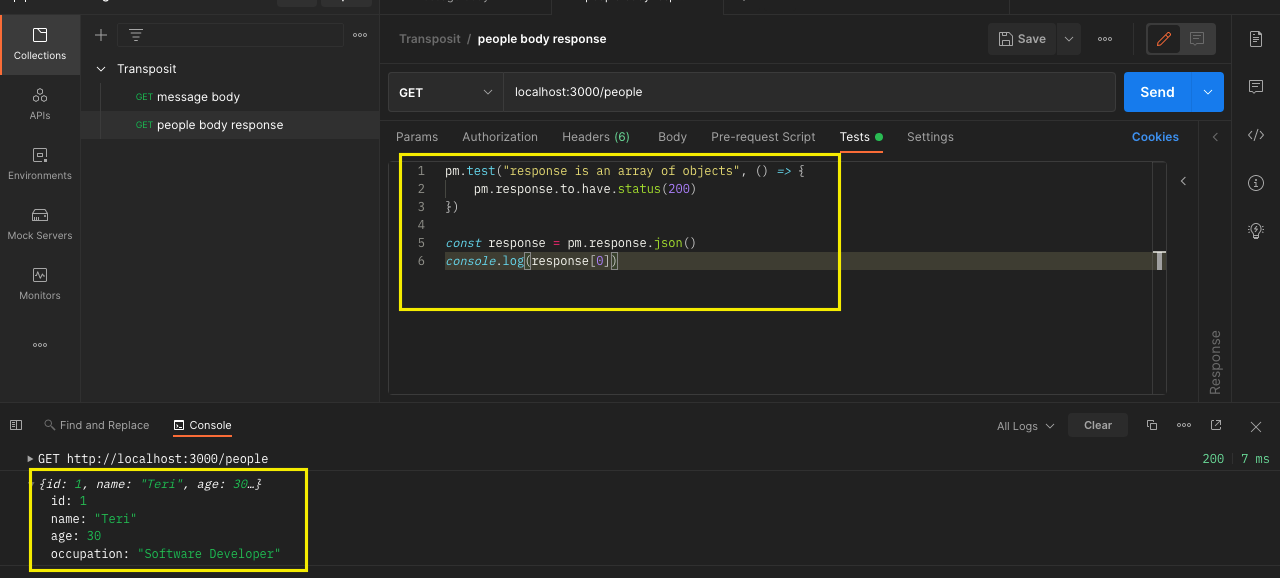
This code gets a single response from the array of objects by indexing the first objects. It then retrieves and displays the value using the console.log function.
Use API testing to identify errors and opportunities for improvement
So how can we identify errors? We can use the built-in Collection Runner tool in Postman to execute the entire collection test suite with just one click. This method can be configured to get responses detailing why the tests failed and pointing us to specific requests to resolve them.
Before running the Collection Runner, we need to create a collection that stores our requests.
First, select either Create collection or the + button, and then enter a name for your collection.

Next, we need to add two new requests for our endpoints.
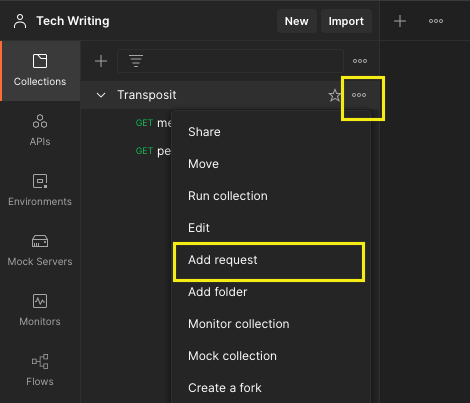
Hover over the collection name and select the … next to the collection name. Then, select Add request.
Name your new request, and make sure GET is selected from the method dropdown list.
Next, set the URL to “localhost:3000”. In the Tests tab, enter the home endpoint assertion test code that you used earlier.
Finally, select Save.
This sets the home endpoint request.
To create a request for the /people endpoint, repeat this process with the appropriate URL and code.
Next, select Runner at the bottom right of the Postman window, then drag the collection over from the left to run it.

Next, we’ll need to configure how we want to run the collection. For this example, we only need to make a small change to the default settings.
Select the Save responses checkbox.
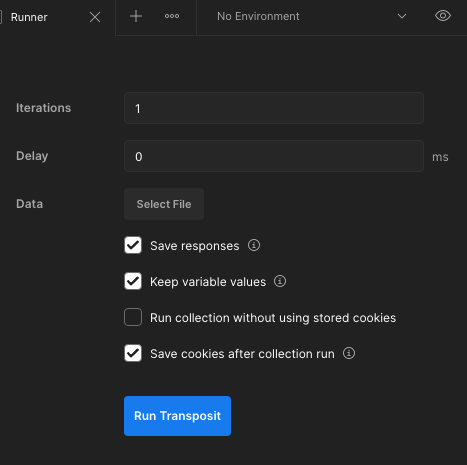
This lets us examine the results and refer to them if something goes wrong during execution.
Finally, select the Run < collection name > button.
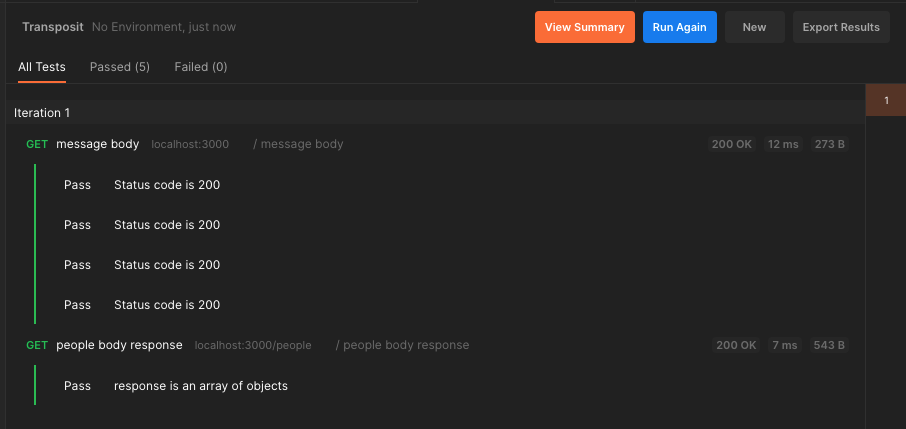
Running the collections should display that all tests passed. If a test fails, check the Tests tab and adjust your tests.
Improve your automated tests
Postman also has monitoring features that let developers schedule exact times and intervals for their tests, integrating email notifications into the process. Combined with the monitoring capabilities of suites like Postman, we can revisit errors at any time to resolve the issue and refine our tests.
Postman is just one of many available tools we can use to develop and maintain automated test suites. Swagger and Katalon both offer similar capabilities, but the platforms emphasize different features and wrap their functionality in different interfaces.
The process of test suite creation itself in Swagger Inspector looks similar, though it is a little more abridged than Postman’s interface. This is because the Swagger platform emphasizes and encourages the development of more rigid and robust APIs from the start — in theory, they should require less testing.
Katalon Studio offers a slightly different approach: it has similar capabilities but presents a low-code system that lets you select code objects from a Keywords Browser and construct tests by assembling and editing these components.
Final notes & best practices
We should keep a few best practices in mind when we build our automated testing suites:
- Our platforms and technology stacks determine which testing tools we use. Our test suites will become a part of our ecosystem and, despite any efforts we may make to avoid dependencies, they will need to integrate with the rest of our CI/CD pipeline — including any enterprise applications we use. Scripted or keyword tests should likewise be constructed to be resilient to UI changes, or else we will need to adjust them if the components they test undergo any UI changes.
- We should also be deliberate in determining which tests to automate. Consider whether the test you’re addressing is repetitive, large in scale, broad in the types of configurations it needs to run on, or otherwise likely to introduce errors when handled manually. High-frequency, high-risk operations are also well suited to automation.
- Consider how to handle the data we feed the tests. Well-designed testing uses high-quality data stored externally. This makes your test suites more portable and extensible and reduces maintenance. A reliable automated test suite simplifies the app development process. Similarly, robust data sources will simplify the test suite development process.
Automated testing principles are a powerful tool to ensure that you can quickly bring reliable, resilient apps to production with minimal maintenance involved afterward.