Getting Started: Creating an Activity
Transposit Activities provide a single source of truth across incidents, tasks, and all operational events — all with automatic documentation

Ticketing is a great way to keep track of the progress of work, but manually updating tickets every time you’ve taken action in another tool or system can be tedious and time consuming. We’re going from GitHub to Jira, to AWS and back to Jira, to Slack and back yet again to Jira — all to document the work that’s been done.
But what if all that documentation could be done automatically? That’s what Transposit Activities provide — a single source of truth across incidents, tasks, and all operational events — all with automatic documentation. Activities are the container for all automation and processes, providing context, visibility, and actionability across the organization.
Activities can be auto-updated by taking the output from an action in a runbook and piping it into the activity field, ensuring context is always up to date, with less manual toil. This level of documentation and transparency streamlines efforts and provides confidence that tickets are being addressed quickly and correctly.
In order to reap all the benefits of activities, it is important to understand how to set them up. One of the hallmarks of Transposit is the fact that its functionality is able to be customized without coding, meaning that any member of your team, technical or non-technical, has the ability to put activities setups in place and even customize their features and functions.
See it in action
Selecting activity types
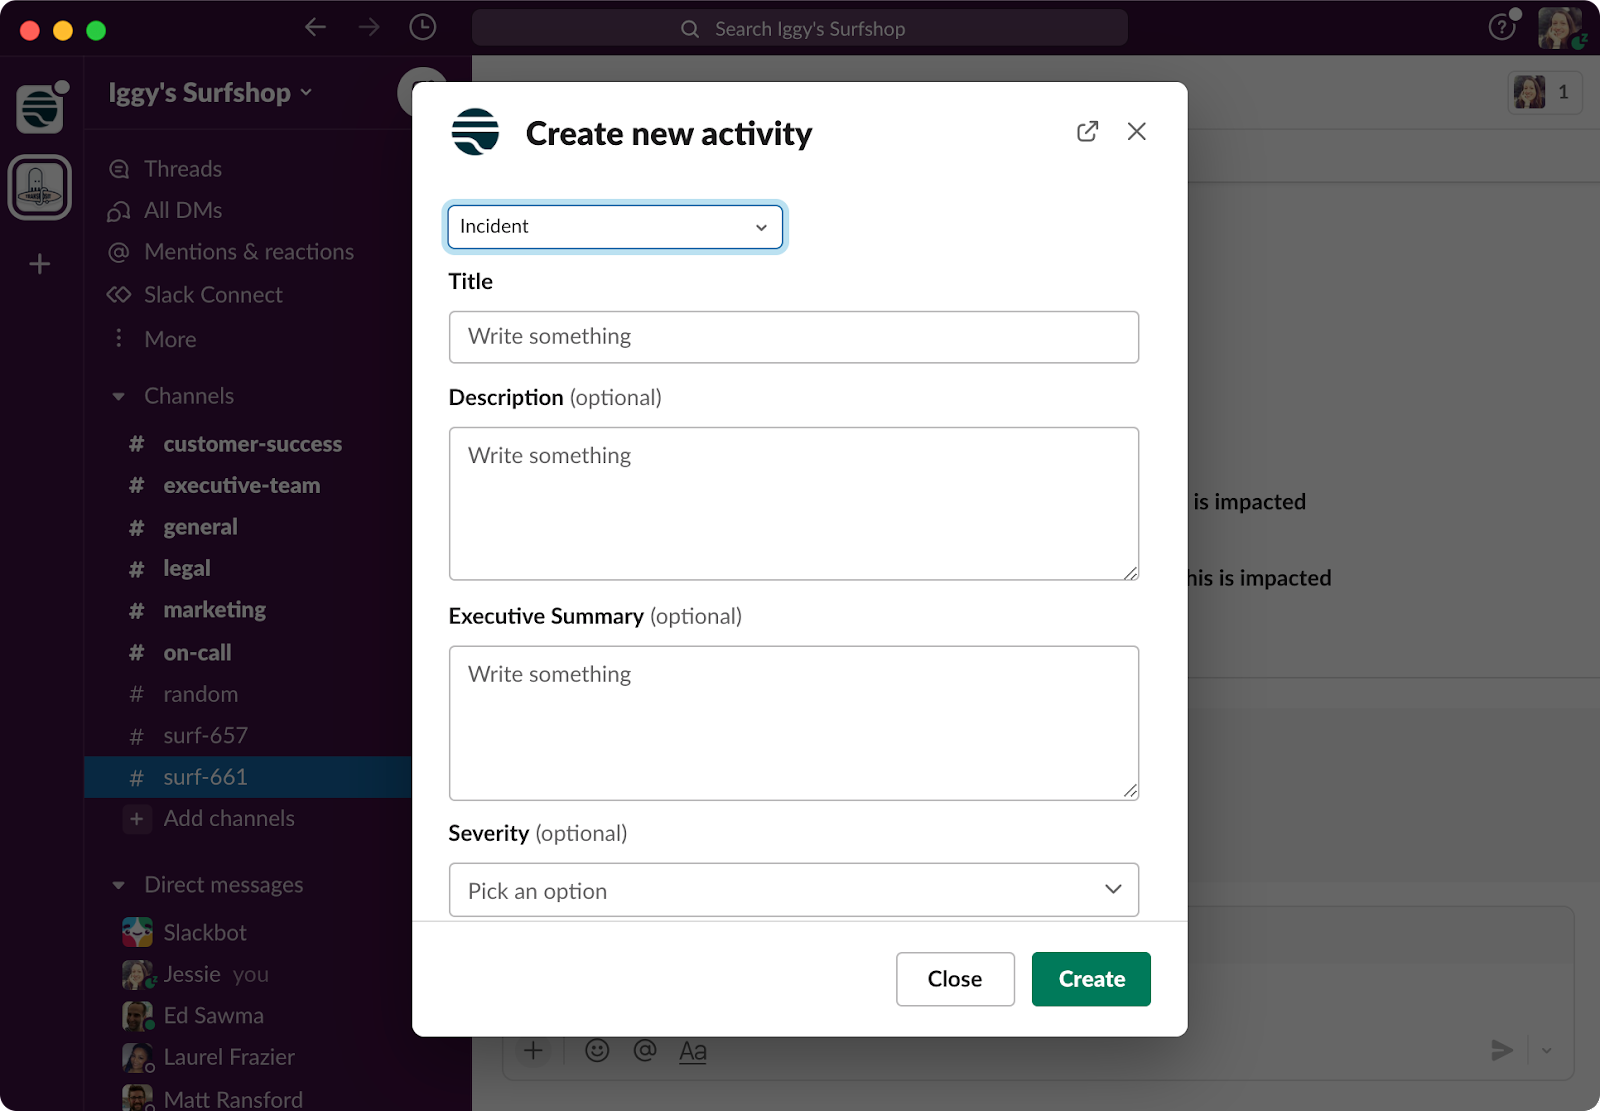
Start by clicking the New button in the Transposit toolbar, and then select the category of the activity within the dialogue box. By default, you will be provided with default types of activities within the dropdown which include Incident and Task.
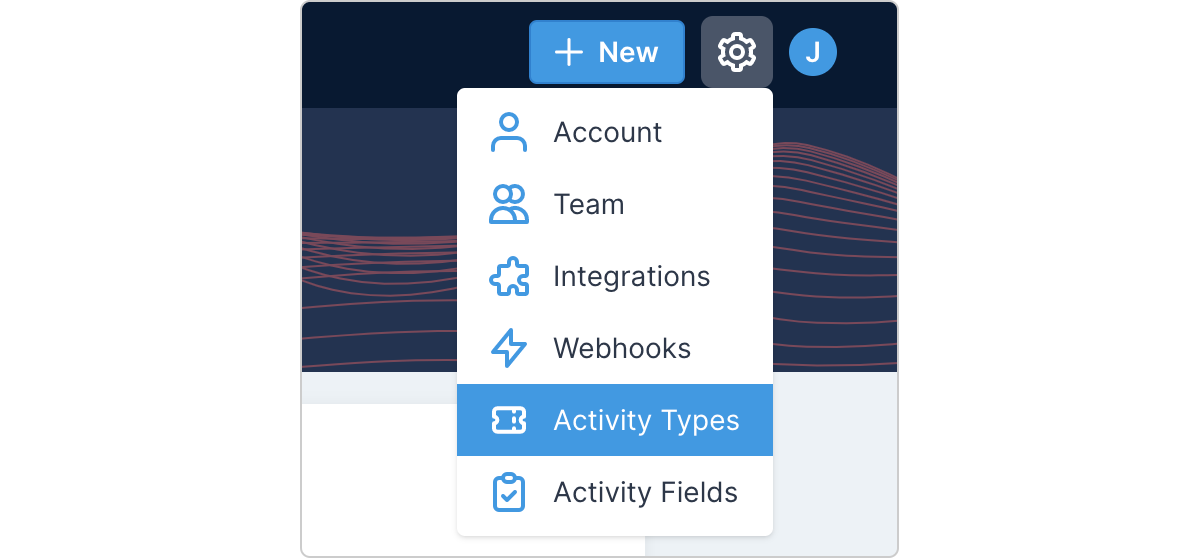
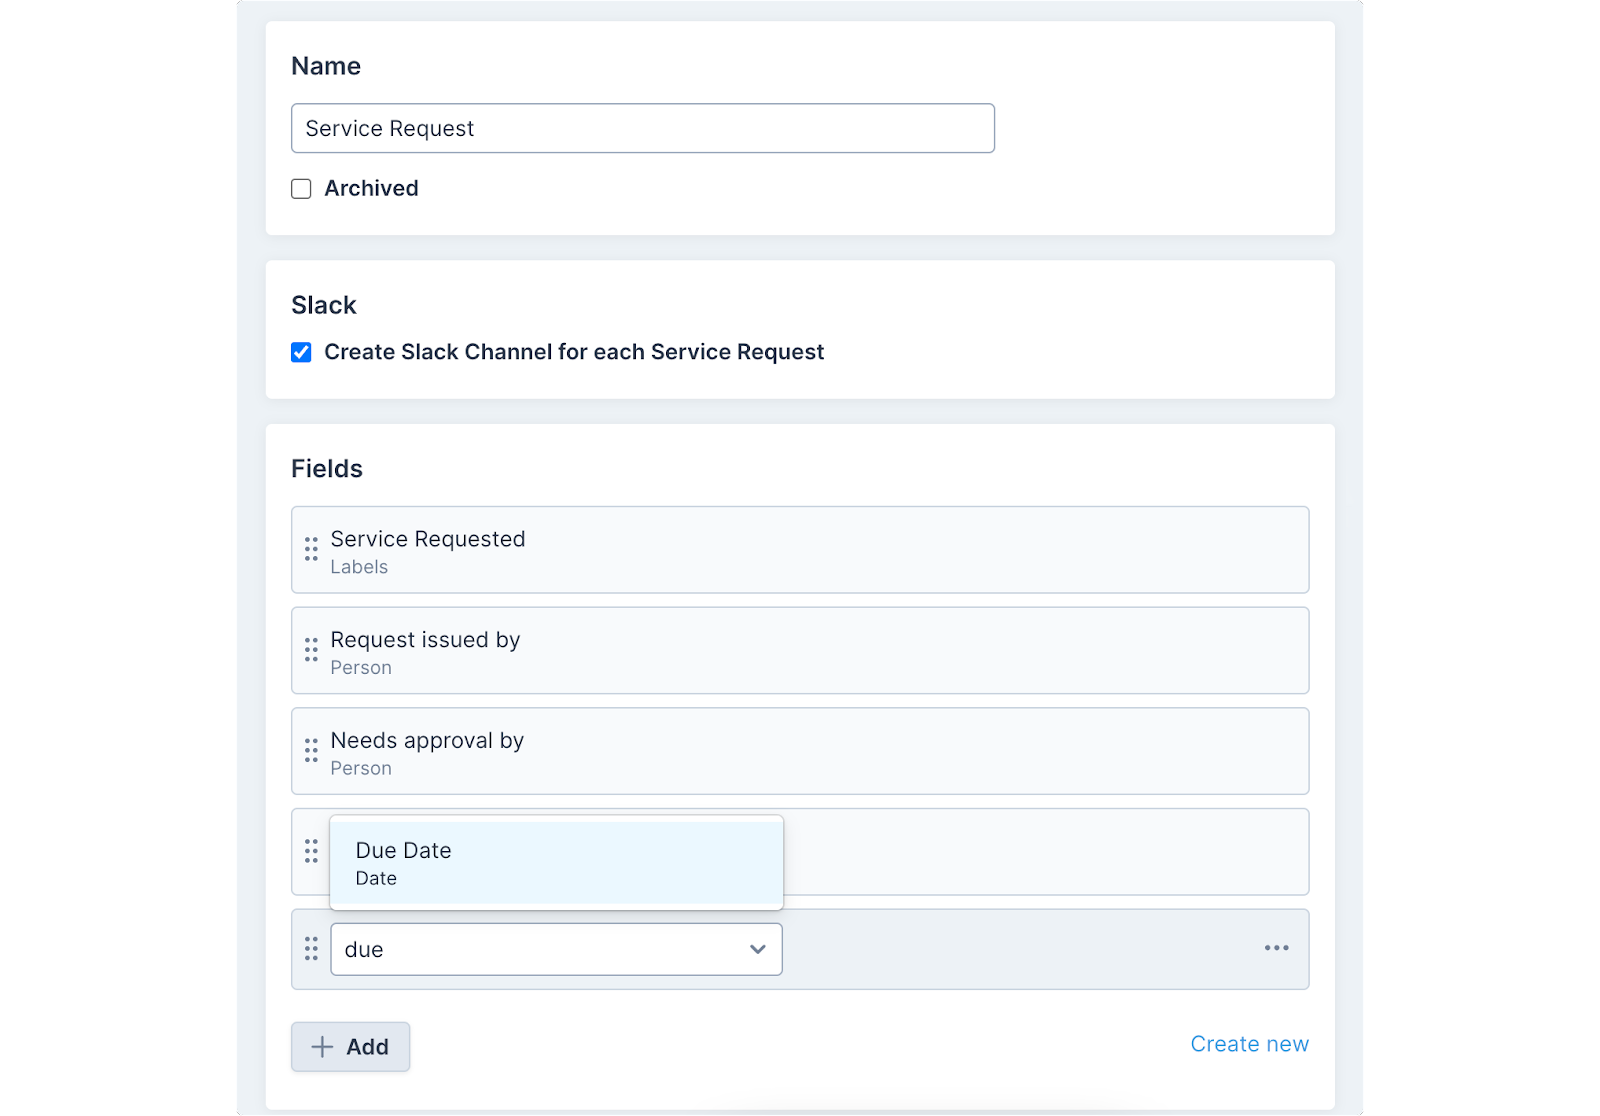
However, as with most fields and inputs throughout Transposit, you can customize the types of activities to make them tailored and intuitive for your team and the nature of the work. Some common activity types users create are service requests, user provisioning, and change requests, but they can literally be anything you want. If you wish to add custom activity types, click the gear button in the top right corner of the dashboard and click Activity Types.
Within this window, you can add new activity types with customizable activity fields.
Selecting the correct types of fields for your activity
The New Activity dialogue box has a lot of other options and fields that must be configured as well in order to optimize the activity’s utility. Some of these fields are required, if so indicated, and others are optional.
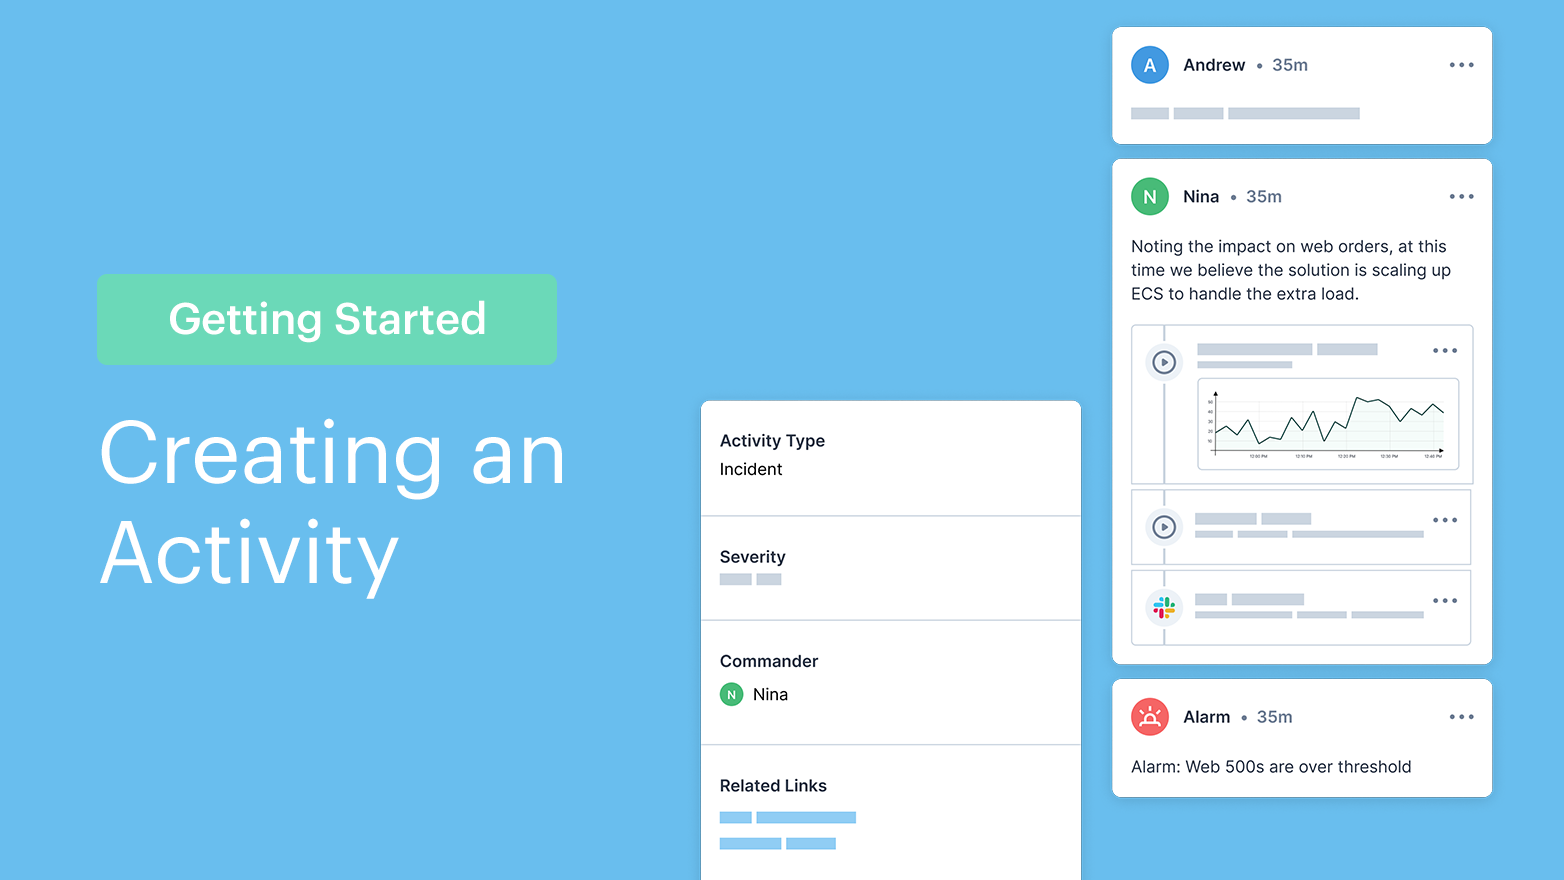
The corresponding fields are different for the default types of activities: an Incident and a Task. The default configuration for an incident is designed to help triage and resolve a problem. The standard fields for an activity categorized as an incident include:
- Title: the name of the activity, which should be unique and descriptive enough to help members of the team easily identify the incident
- Description: a space to include more detail surrounding the incident
- Executive Summary: allows for a high-level explanation of the purpose and context of the incident
- Severity: a dropdown list to help the team triage and prioritize the incident according to urgency
- Commander: the name of the person within your Transposit team that will have oversight of the incident ticket
- Related Link: allows embedding of hyperlinks which can provide resources or examples or context that correspond with the incident
- Environment: a dropdown list where you select which development environment the incident applies to
- Impacted Services: an open response field that provides keyword tags related to the services that are affected by the incident, and can be used to sort and filter groups of incidents or filter them into the dashboards of members of corresponding departments
- Video Conference Link: allows easy embedding of links to Zoom, Google Meet, or other conferencing clients where the incident will be discussed
- Communications Lead: similar to the commander, this is a dropdown menu where you select the member of your Transposit team that is responsible for project management and/or account management related to the incident
- Labels: similar to Impacted Services, this is an open response field where you are able to add tags to the incident that help with sorting, filtering, and otherwise making the incident easily visible to the correct people
The default configuration of an activity categorized as a task is designed for scheduling and prioritizing to-do items for the team. The standard fields for an activity categorized as a task are mostly the same as an Incident, but there are some unique fields as well, which include:
- Due Date: allows you to select a target date of completion for the Task
- Reporter: similar to a communications lead on an Incident, this is where you select the project manager or the person in charge of sharing information on this Task with other groups outside of those assigned to the Task
- Task Status: a dropdown for providing visible updates to progress on the task, including options for To-Do (or not yet started), In Progress, Blocked, or Done
Customizing your activity fields
On any of your activities, you are not limited to the default configuration of these fields. You are able to add new types of fields depending on the specific needs of your team or the type of project you are undertaking. And if you are constructing a new type of activity rather than using one of the default options, this will be necessary. To add custom fields to your activity, click the gear button in the top right corner of the dashboard, and select Activity Fields at the bottom of the dropdown. From this All Activity Fields page, you can see all of the fields that are currently in use in your various Activities.
To create a new field, click the button in the top left corner of the page that says New activity field. Within this new field page, you have three dialogue boxes that you must complete.
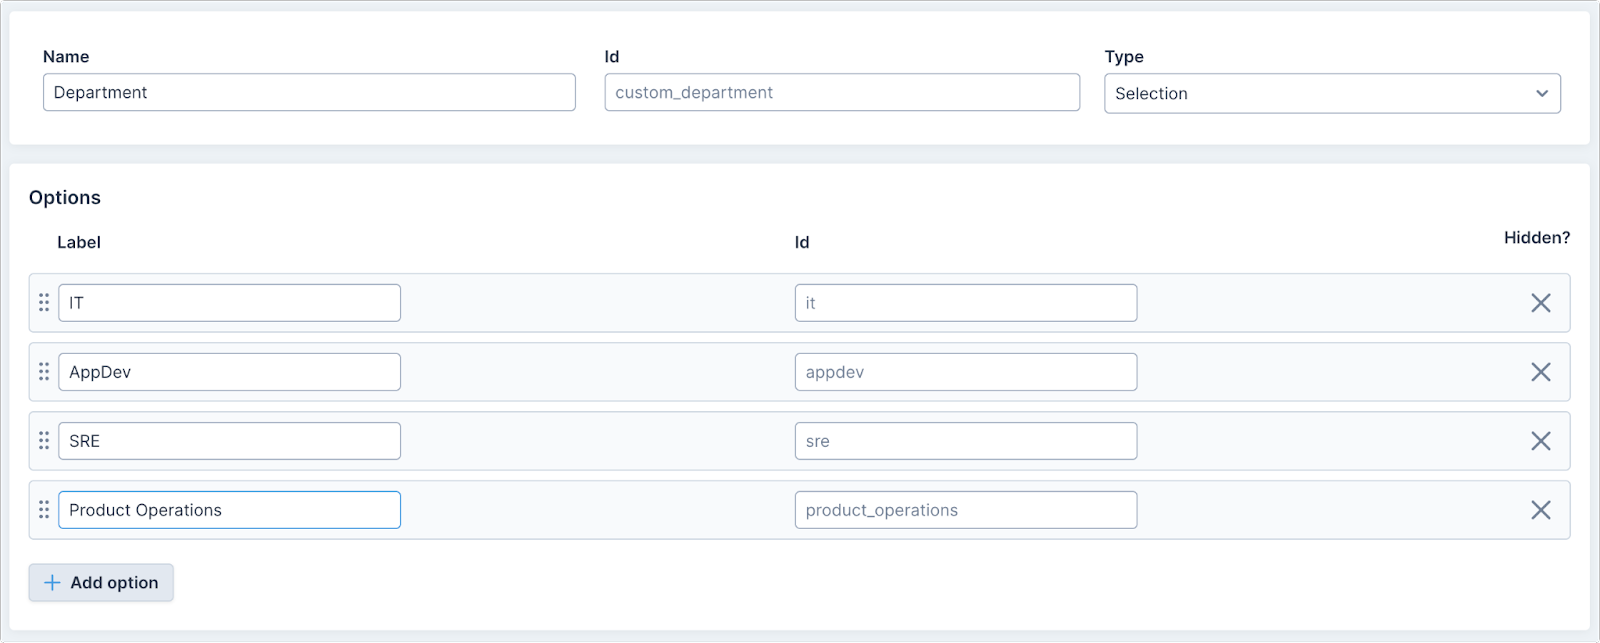
First choose the activity Name and ID, which must end in an alphanumeric character and can only contain lowercase letters, numbers, and the underscore character. The third field, Type, contains a dropdown with every different type of pre-made entry configuration possible in Transposit. These entry types include:
- Short Text: a simple text entry field used for short bits of information
- Labels: a text entry field where each word or phrase is turned into a label
- Long Text: a text entry field more amenable to full sentences and paragraphs
- Selection: allows you to create a predetermined list of optional categories for selection
- Multi-Select: like the Selection option, except it allows users to choose multiple selections at the same time
- URL: a field where users add a web address or a word or phrase hyperlinked to a website
- Date: prompts the user to select a month and day corresponding to the Activity
- Date and Time: like Date, but also allows user to select the time of day as well
- Person: prompts users to select/assign accounts of colleague(s) from the Transposit team
- List of Links: allows user to provide multiple URLs
Creating an activity with Slack
Although activities can easily be created from scratch as described above, Transposit also integrates with Slack, the third-party business communication platform. Once Transposit is synced with your organization’s Slack, within a Slack channel, you simply need to type /transposit new and hit Enter and you will be prompted with the same dialogue box workflow described above.
Note that unlike within the Transposit dashboard, you will be restricted to the activity options already created in your Transposit backend, so if you wish to create a new type of event, you must do this in your dashboard before creating an activity of this type within Slack.
You can also edit an activity within Slack using /transposit edit.
Creating an activity from an event
The synchronization and automation of Transposit makes it effortless to create activities as dictated by the events taking place in your workflow. Inside the Transposit dashboard, each incoming event appears in the activity feed. These events have an embedded Create Activity button right inside of them, which opens the same dialogue box as described above.
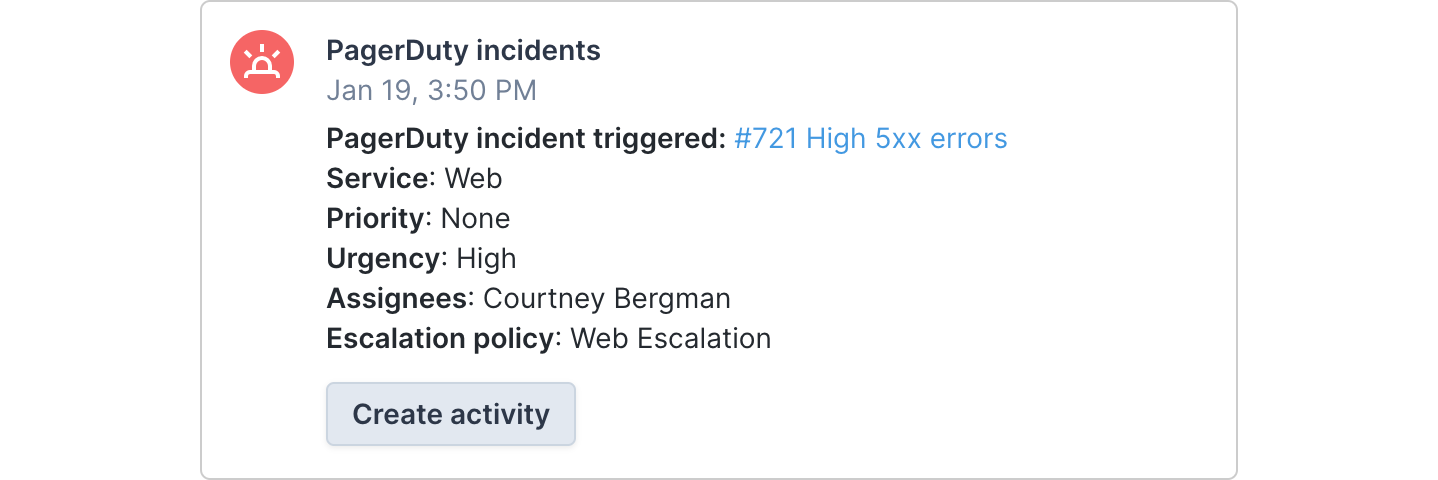
Similarly, if you configure it to do so in Slack, events may also appear in your Slack channels as well. As in the Transposit feed, the event in Slack will appear with a Create Activity button that opens the same Activity dialogue box.
Using your activity
Once you have created an activity and filled out each of the corresponding fields, it will appear in the Activity Overview and the Timeline of your team’s Transposit dashboard.
Learn more about Transposit Activities and how to use them in Documentation.