Overview
When you're creating scripts, you can include user input dialogs as input prompts for your team's incident responders.
The Transposit no-code low-code Form Builder helps you to quickly and efficiently put together user input dialogs. However, for ideation and even for generating your complete user input dialogs, you can interact with chat.openai.com. The complete user input dialog below can be generated via OpenAI in this way, as described in detail below.

This is possible because you can access the JSON content that the Form Builder generates and then include that JSON content in your OpenAI prompts. OpenAI can use the initial scripts that you provide to generate more expressive scripts based on the additional context you include in the prompt, such as (although more expressive prompt examples are provided below) "Use the script below to generate a new script for AWS authentication."
OpenAI is not perfect and may generate JSON content that is invalid in Transposit. Always save successfully OpenAI-generated Transposit scripts so that you can revert when OpenAI generates broken or invalid Transposit scripts.
Open the JSON Editor
Start by creating a new script and opening it in the JSON Editor, as described below.
Go to the Automation Hub and create a new script.
In the Script Editor, look at the URL in the browser. The URL ends as follows:
:latest#config
Change the above to:
:latest?json=true
Press Enter and the JSON Editor opens, showing you the following default script definition.

The script shown above is as follows, which is the absolute minimum content of a Transposit script.
{
   "scriptedAction": {
     "inputs": [],
     "outputs": [],
     "chainItems": [],
     "errorChainItems": [],
     "fieldDependency": {
       "v1": {
         "dependencyType": "NO_ACTIVITY",
         "activityTypeGlobalId": "",
         "activityTemplateGlobalId": ""
       }
     },
     "inputForm": ""
   },
   "description": "",
   "displayName": "your-script-name"
 }
You've now seen how to access the JSON content for scripts generated in Transposit.
Use the above Transposit script as the default script to revert to when you need to reset, where applicable, after using OpenAI.
In the next section, you add a user input dialog and access its JSON content.
Generate Initial OpenAI Prompt Content
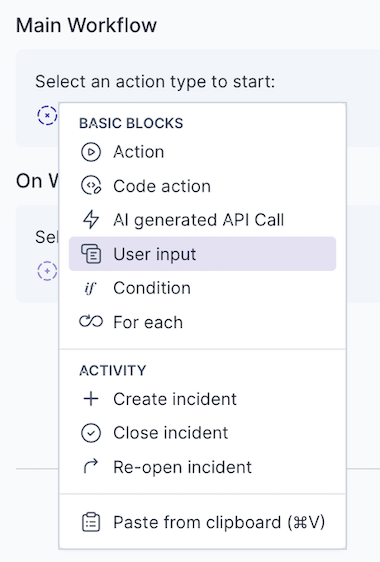
Next, add a user input dialog with some basic content, as described below.
In the bottom right of the JSON Editor, click Edit as Script.
Select User input in the Main Workflow drop-down list.
Click the Edit Form button above the Form Preview section on the right, as shown below.
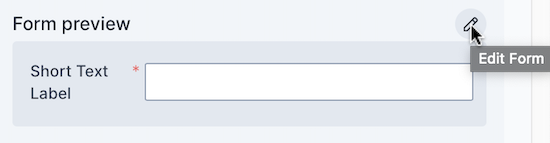
In addition to the Short Text Label that is included by default, add a Checkbox, so that your Form preview looks as shown below.

See Form Builder Reference for details.
Click Save in the Form Builder and click Save in the Script Editor.
Switch to the JSON Editor, as described above, and notice that your JSON content is now as follows.
{
   "scriptedAction": {
     "inputs": [],
     "outputs": [],
     "chainItems": [
       {
         "action": {
           "app": {
             "name": "transposit_user_input",
             "maintainer": "transposit",
             "tag": "v1.*.*"
           },
           "inputs": [
             {
               "name": "input_form_blocks",
               "prettyName": "",
               "description": "",
               "type": "OBJECT",
               "value": "{\"blocks\":[{\"block_id\":\"short_text-action\",\"label\":{\"text\":\"Short Text Label\",\"emoji\":true,\"type\":\"plain_text\"},\"element\":{\"action_id\":\"short_text-action\",\"placeholder\":null,\"initial_value\":null,\"multiline\":false,\"min_length\":null,\"max_length\":null,\"type\":\"plain_text_input\"},\"hint\":null,\"optional\":false,\"type\":\"input\"},{\"block_id\":\"checkbox-action\",\"label\":{\"text\":\"Checkbox Label\",\"emoji\":true,\"type\":\"plain_text\"},\"element\":{\"action_id\":\"checkbox-action\",\"initially_checked\":false,\"type\":\"checkbox\"},\"hint\":null,\"optional\":false,\"type\":\"input\"}]}"
             }
           ],
           "dependencyKeys": []
         },
         "id": "1b1c5928-c84f-4590-a1e9-868595b2dc1c",
         "prettyName": "Transposit user input form builder"
       }
     ],
     "errorChainItems": [],
     "fieldDependency": {
       "v1": {
         "dependencyType": "NO_ACTIVITY",
         "activityTypeGlobalId": "",
         "activityTemplateGlobalId": ""
       }
     },
     "inputForm": ""
   },
   "description": "",
   "displayName": "Demo Gj Script"
}
In the code generated above by the Form Builder, notice the value field, which defines an array of blocks, with short-text_action as the block_id of text fields and checkbox_action as the block_id of checkboxes.
In the next section, OpenAI will generate more expressive combinations of those blocks.
Train OpenAI
In this section, you use the generated Transposit script to train OpenAI.
Go to chat.openai.com.
In the OpenAI prompt, type (or copy and paste) the following and then copy and paste the Transposit script above:
Here is a Transposit script, use short-text_action for text fields and checkbox_action for options, and create a typical AWS security form with at least three different options:
Experiment with other prompts to finetune the generated output to your requirements.
- Press Enter and something similar to the following is generated.
{
   "scriptedAction": {
     "inputs": [],
     "outputs": [],
     "chainItems": [
       {
         "action": {
           "app": {
             "name": "transposit_user_input",
             "maintainer": "transposit",
             "tag": "v1.*.*"
           },
           "inputs": [
             {
               "name": "input_form_blocks",
               "prettyName": "",
               "description": "",
               "type": "OBJECT",
               "value": "{\"blocks\":[{\"block_id\":\"access_key_id\",\"label\":{\"text\":\"AWS Access Key ID\",\"type\":\"plain_text\"},\"element\":{\"action_id\":\"short_text-action\",\"placeholder\":{\"type\":\"plain_text\",\"text\":\"Enter your AWS Access Key ID\"},\"type\":\"plain_text_input\"},\"hint\":null,\"optional\":false,\"type\":\"input\"},{\"block_id\":\"secret_access_key\",\"label\":{\"text\":\"AWS Secret Access Key\",\"type\":\"plain_text\"},\"element\":{\"action_id\":\"short_text-action\",\"placeholder\":{\"type\":\"plain_text\",\"text\":\"Enter your AWS Secret Access Key\"},\"type\":\"plain_text_input\"},\"hint\":null,\"optional\":false,\"type\":\"input\"},{\"block_id\":\"region\",\"label\":{\"text\":\"AWS Region\",\"type\":\"plain_text\"},\"element\":{\"action_id\":\"short_text-action\",\"placeholder\":{\"type\":\"plain_text\",\"text\":\"Enter your AWS Region\"},\"type\":\"plain_text_input\"},\"hint\":null,\"optional\":false,\"type\":\"input\"},{\"block_id\":\"enable_mfa\",\"label\":{\"text\":\"Enable Multi-Factor Authentication (MFA)\",\"type\":\"plain_text\"},\"element\":{\"action_id\":\"checkbox-action\",\"initially_checked\":false,\"type\":\"checkbox\"},\"hint\":null,\"optional\":false,\"type\":\"input\"},{\"block_id\":\"enable_encryption\",\"label\":{\"text\":\"Enable Encryption\",\"type\":\"plain_text\"},\"element\":{\"action_id\":\"checkbox-action\",\"initially_checked\":false,\"type\":\"checkbox\"},\"hint\":null,\"optional\":false,\"type\":\"input\"},{\"block_id\":\"enable_logging\",\"label\":{\"text\":\"Enable Logging\",\"type\":\"plain_text\"},\"element\":{\"action_id\":\"checkbox-action\",\"initially_checked\":false,\"type\":\"checkbox\"},\"hint\":null,\"optional\":false,\"type\":\"input\"}]}"
             }
           ],
           "dependencyKeys": []
         },
         "id": "1b1c5928-c84f-4590-a1e9-868595b2dc1c",
         "prettyName": "AWS Security Form Builder"
       }
     ],
     "errorChainItems": [],
     "fieldDependency": {
       "v1": {
         "dependencyType": "NO_ACTIVITY",
         "activityTypeGlobalId": "",
         "activityTemplateGlobalId": ""
       }
     },
     "inputForm": ""
   },
   "description": "AWS security form with access key, secret key, region, and security settings options",
   "displayName": "AWS Security Form"
 }
In Transposit, paste the above OpenAI-generated content in the JSON Editor, click Save, and click Test. You should now see something similar to the following.

You've now seen how to train OpenAI with your initial Transposit script and generate more expressive Transposit scripts.
Train OpenAI More
In this section, you see how to train OpenAI with additional Transposit scripts.
- Switch back to the Form Builder, add a Person field, and switch back to the JSON Editor. Notice that the following is generated in the value field to specify the Person definition.
{\"block_id\":\"person-action\",\"label\":{\"text\":\"Person Label\",\"emoji\":true,\"type\":\"plain_text\"},\"element\":{\"placeholder\":null,\"action_id\":\"person-action\",\"initial_user\":null,\"type\":\"users_select\"},\"hint\":null,\"optional\":false,\"type\":\"input\"}
- In the OpenAI prompt, type (or copy and paste) the following, and then copy and paste the above Person definition into the prompt:
This is the description of a Person, add the possibility of having two people assigned to the security dialog:
- Press Enter and something similar to the following is generated.
{
   "scriptedAction": {
     "inputs": [],
     "outputs": [],
     "chainItems": [
       {
         "action": {
           "app": {
             "name": "transposit_user_input",
             "maintainer": "transposit",
             "tag": "v1.*.*"
           },
           "inputs": [
             {
               "name": "input_form_blocks",
               "prettyName": "",
               "description": "",
               "type": "OBJECT",
               "value": "{\"blocks\":[{\"block_id\":\"access_key_id\",\"label\":{\"text\":\"AWS Access Key ID\",\"type\":\"plain_text\"},\"element\":{\"action_id\":\"short_text-action\",\"placeholder\":{\"type\":\"plain_text\",\"text\":\"Enter your AWS Access Key ID\"},\"type\":\"plain_text_input\"},\"hint\":null,\"optional\":false,\"type\":\"input\"},{\"block_id\":\"secret_access_key\",\"label\":{\"text\":\"AWS Secret Access Key\",\"type\":\"plain_text\"},\"element\":{\"action_id\":\"short_text-action\",\"placeholder\":{\"type\":\"plain_text\",\"text\":\"Enter your AWS Secret Access Key\"},\"type\":\"plain_text_input\"},\"hint\":null,\"optional\":false,\"type\":\"input\"},{\"block_id\":\"region\",\"label\":{\"text\":\"AWS Region\",\"type\":\"plain_text\"},\"element\":{\"action_id\":\"short_text-action\",\"placeholder\":{\"type\":\"plain_text\",\"text\":\"Enter your AWS Region\"},\"type\":\"plain_text_input\"},\"hint\":null,\"optional\":false,\"type\":\"input\"},{\"block_id\":\"person1\",\"label\":{\"text\":\"Person 1\",\"type\":\"plain_text\"},\"element\":{\"placeholder\":null,\"action_id\":\"person-action\",\"initial_user\":null,\"type\":\"users_select\"},\"hint\":null,\"optional\":false,\"type\":\"input\"},{\"block_id\":\"person2\",\"label\":{\"text\":\"Person 2\",\"type\":\"plain_text\"},\"element\":{\"placeholder\":null,\"action_id\":\"person-action\",\"initial_user\":null,\"type\":\"users_select\"},\"hint\":null,\"optional\":false,\"type\":\"input\"},{\"block_id\":\"enable_mfa\",\"label\":{\"text\":\"Enable Multi-Factor Authentication (MFA)\",\"type\":\"plain_text\"},\"element\":{\"action_id\":\"checkbox-action\",\"initially_checked\":false,\"type\":\"checkbox\"},\"hint\":null,\"optional\":false,\"type\":\"input\"},{\"block_id\":\"enable_encryption\",\"label\":{\"text\":\"Enable Encryption\",\"type\":\"plain_text\"},\"element\":{\"action_id\":\"checkbox-action\",\"initially_checked\":false,\"type\":\"checkbox\"},\"hint\":null,\"optional\":false,\"type\":\"input\"},{\"block_id\":\"enable_logging\",\"label\":{\"text\":\"Enable Logging\",\"type\":\"plain_text\"},\"element\":{\"action_id\":\"checkbox-action\",\"initially_checked\":false,\"type\":\"checkbox\"},\"hint\":null,\"optional\":false,\"type\":\"input\"}]}"
             }
           ],
           "dependencyKeys": []
         },
         "id": "1b1c5928-c84f-4590-a1e9-868595b2dc1c",
         "prettyName": "AWS Security Form Builder"
       }
     ],
     "errorChainItems": [],
     "fieldDependency": {
       "v1": {
         "dependencyType": "NO_ACTIVITY",
         "activityTypeGlobalId": "",
         "activityTemplateGlobalId": ""
       }
     },
     "inputForm": ""
   },
   "description": "AWS security form with access key, secret key, region, assigned people, and security settings options",
   "displayName": "AWS Security Form"
 }
Paste the above OpenAI-generated content in the JSON Editor, click Save, and click Test. You should now see something like the following.
The values in the Person drop-down list are those that have been set as users in your Transposit environment.
After successfully generating new Transposit scripts with OpenAI, you can always go back to the Form Builder to reorder the items in the user input dialog, as well as to rename or tweak them in other ways.

You've now seen how to train OpenAI to understand additional Transposit form fields and generate new Transposit scripts making use of that supplemental content, which Transposit understands and its Form Builder can handle.